How to: Twine wrapped pencil holder
D.I.Y. pencil holder
I am so happy with how this project turned out. So simple but such a great result.
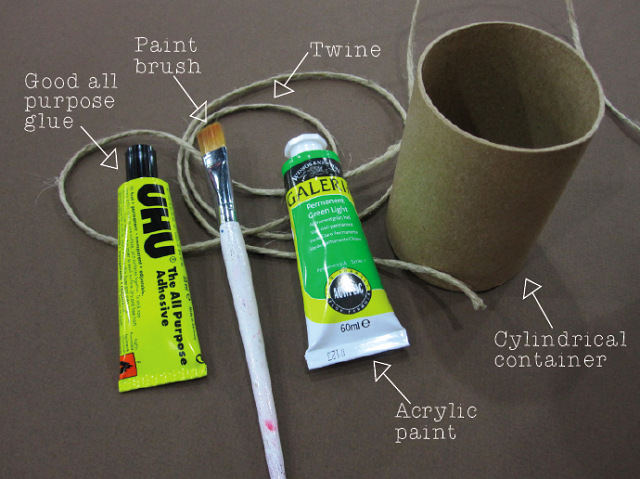
You will need
Glue: I have said it before and I will say it again, this UHU all purpose glue is the really good! Can’t get Uhu? No dramas. For this project just look for a glue that is nice and strong and dries fast. If you can’t get a fast drying glue you just need one with a good strong tack so it will hold the twine as you go.
Paint brush: pretty much any brush will do, or even a sponge for that matter. You are only using this to paint the base. No special details so whatever you have should be fine.
Twine: I used 7 meters (7.65 yards) to cover this container. How much you will need will depend of the size of your container and the width of your twine.
Acrylic paint: This is where it gets personal. Pick a colour YOU like and go with it. I LOVE this Windsor and Newton Permanent green light. Plus I think it looks great with the natural colour of the twine.
Cylindrical container: I found this great papier mache cylindrical pencil holder base. Again I like the natural colouring of it. To make this project a more eco-friendly craft you could use a tin can or a section of a postage tube. You could even just make the shape from a cardboard box.
Paper and sticky tape: Missed these ones in the photo. This is just for masking so it doesn’t need to be anything special.
The steps:
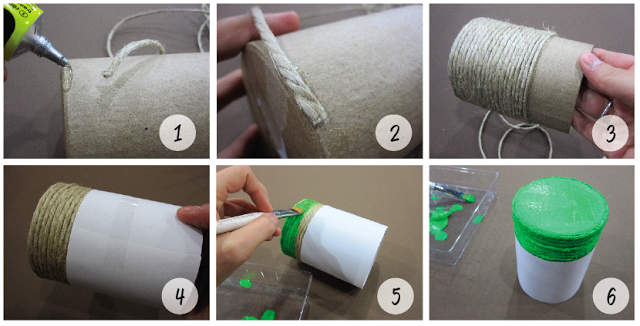
1. Apply some glue at the base of the container.
2. Stick the end of the twine to the container. Wait a little while for the glue to take hold of the twine. It will make it easier to wrap if the glue is holding it in place from the start.
3. Continue to apply glue and and wrap the twine around the container. Use the same technique as steps 1 and 2. Apply a section of glue, then lay the twine over that spot. Wait a few seconds for the glue to take hold and continue on.
4. Once you have wrapped the whole thing cover the section you don’t want painted with a strip of paper. Because the twine is a constant coil you will find it hard to get a nice even line if you don’t mask off the section you want to remain paint free.
5. Start painting! Apply as many coats as you need. I only did one coat but I was using quite a good quality paint and it was quite opaque. If you find you are not getting a good coverage from your paint you could start white base coat and build it up from there.
6. Leave it standing upside down to try. Because you are using acrylic paint this won’t take to long.
Super simple hey! After doing this I just want to find more stuff I can wrap in twine!
So what do you think…?
Got any thoughts on how you would have made this differently?
What colour would you have chosen?
Have you used twine in your projects? Tell me what you have made. 🙂





-0 Comment-